Notice
Recent Posts
Recent Comments
Link
| 일 | 월 | 화 | 수 | 목 | 금 | 토 |
|---|---|---|---|---|---|---|
| 1 | ||||||
| 2 | 3 | 4 | 5 | 6 | 7 | 8 |
| 9 | 10 | 11 | 12 | 13 | 14 | 15 |
| 16 | 17 | 18 | 19 | 20 | 21 | 22 |
| 23 | 24 | 25 | 26 | 27 | 28 | 29 |
| 30 |
Tags
- mvvm
- uikit
- list
- class
- self
- Animation
- 글또
- Git
- calendar
- IOS
- NotificationCenter
- Switch
- viewlifecycle
- http
- error
- array
- 화면전환
- 고차함수
- struct
- escaping
- apns
- ScrollView
- segue
- SWIFT
- Refresh
- Observer
- singleton
- PushNotification
- SWIFTUI
- CoreImage
Archives
- Today
- Total
seong_hye, the developer
SwiftUI) 이미지 채도, 명도 조절해보기 본문
📘 이미지 명도와 채도 조절
🔹 주요 필터
CIColorControls
이미지의 색상 속성을 조절할 수 있는 가장 기본적이고 유용한 필터
kCIInputBrightnessKey: 명도 조절 ( -1.0 (어두움) ~ 1.0 (밝음), 기본값: 0.0 )
kCIInputSaturationKey: 채도 조절 ( 0.0 (흑백) ~ 2.0 (더 진한 색감), 기본값: 1.0)
kCIInputContrastKey: 대비 조절
🔹 예시 코드 - SwiftUI
import CoreImage
import CoreImage.CIFilterBuiltins

struct ContextView: View {
    // 원본 이미지 로드
    @State private var originalImage = UIImage(named: "example.png")!

    // 명도와 채도를 조절할 상태값
    @State private var brightness: Double = 0.0  // 명도 (-1 ~ 1)
    @State private var saturation: Double = 1.0  // 채도 (0 ~ 2)

    // 필터 및 컨텍스트 설정
    private let context = CIContext()
    private let filter = CIFilter.colorControls()

    var body: some View {
        VStack(spacing: 30) {
            // 이미지 표시
            Image(uiImage: filteredImage())
                .resizable()
                .scaledToFit()
                .frame(height: 300)
                .clipShape(RoundedRectangle(cornerRadius: 16))
                .shadow(radius: 5)
                .padding()

            // 명도 슬라이더
            VStack {
                Text("명도 (Brightness): \(brightness, specifier: "%.2f")")
                Slider(value: $brightness, in: -1.0...1.0, step: 0.01)
                    .padding(.horizontal)
            }

            // 채도 슬라이더
            VStack {
                Text("채도 (Saturation): \(saturation, specifier: "%.2f")")
                Slider(value: $saturation, in: 0.0...2.0, step: 0.01)
                    .padding(.horizontal)
            }
        }
    }

    // 이미지 필터링 메서드
    private func filteredImage() -> UIImage {
        let inputImage = CIImage(image: originalImage)

        filter.inputImage = inputImage
        filter.brightness = Float(brightness)
        filter.saturation = Float(saturation)

        guard let outputImage = filter.outputImage,
              let cgimg = context.createCGImage(outputImage, from: outputImage.extent) else {
            return originalImage
        }

        return UIImage(cgImage: cgimg)
    }
}
🔹 예시 코드 - UIKit
// 명도, 채도 조정 함수
func adjustBrightnessAndSaturation(
    image: UIImage,
    brightness: Float,  // 명도 (-1.0 ~ 1.0, 0 기본)
    saturation: Float   // 채도 (0.0 ~ 2.0, 1 기본)
) -> UIImage? {

    // UIImage를 CIImage로 변환
    guard let inputCIImage = CIImage(image: image) else { return nil }

    // CIFilter 생성 (ColorControls 필터)
    guard let filter = CIFilter(name: "CIColorControls") else { return nil }

    // 필터에 이미지 설정
    filter.setValue(inputCIImage, forKey: kCIInputImageKey)

    // 명도 및 채도 설정
    filter.setValue(brightness, forKey: kCIInputBrightnessKey)
    filter.setValue(saturation, forKey: kCIInputSaturationKey)

    // 필터에서 처리된 이미지 가져오기
    guard let outputCIImage = filter.outputImage else { return nil }

    // 결과 이미지를 CGImage로 변환
    let context = CIContext(options: nil)
    guard let cgImage = context.createCGImage(outputCIImage, from: outputCIImage.extent) else {
        return nil
    }

    // 최종 UIImage로 변환
    return UIImage(cgImage: cgImage)
}
// 이미지 명도(+0.2 밝게), 채도(1.5배 진하게) 조정
if let adjustedImage = adjustBrightnessAndSaturation(
image: originalImage,
brightness: 0.2,
saturation: 1.5
) {
imageView.image = adjustedImage
}🔹 예시 화면

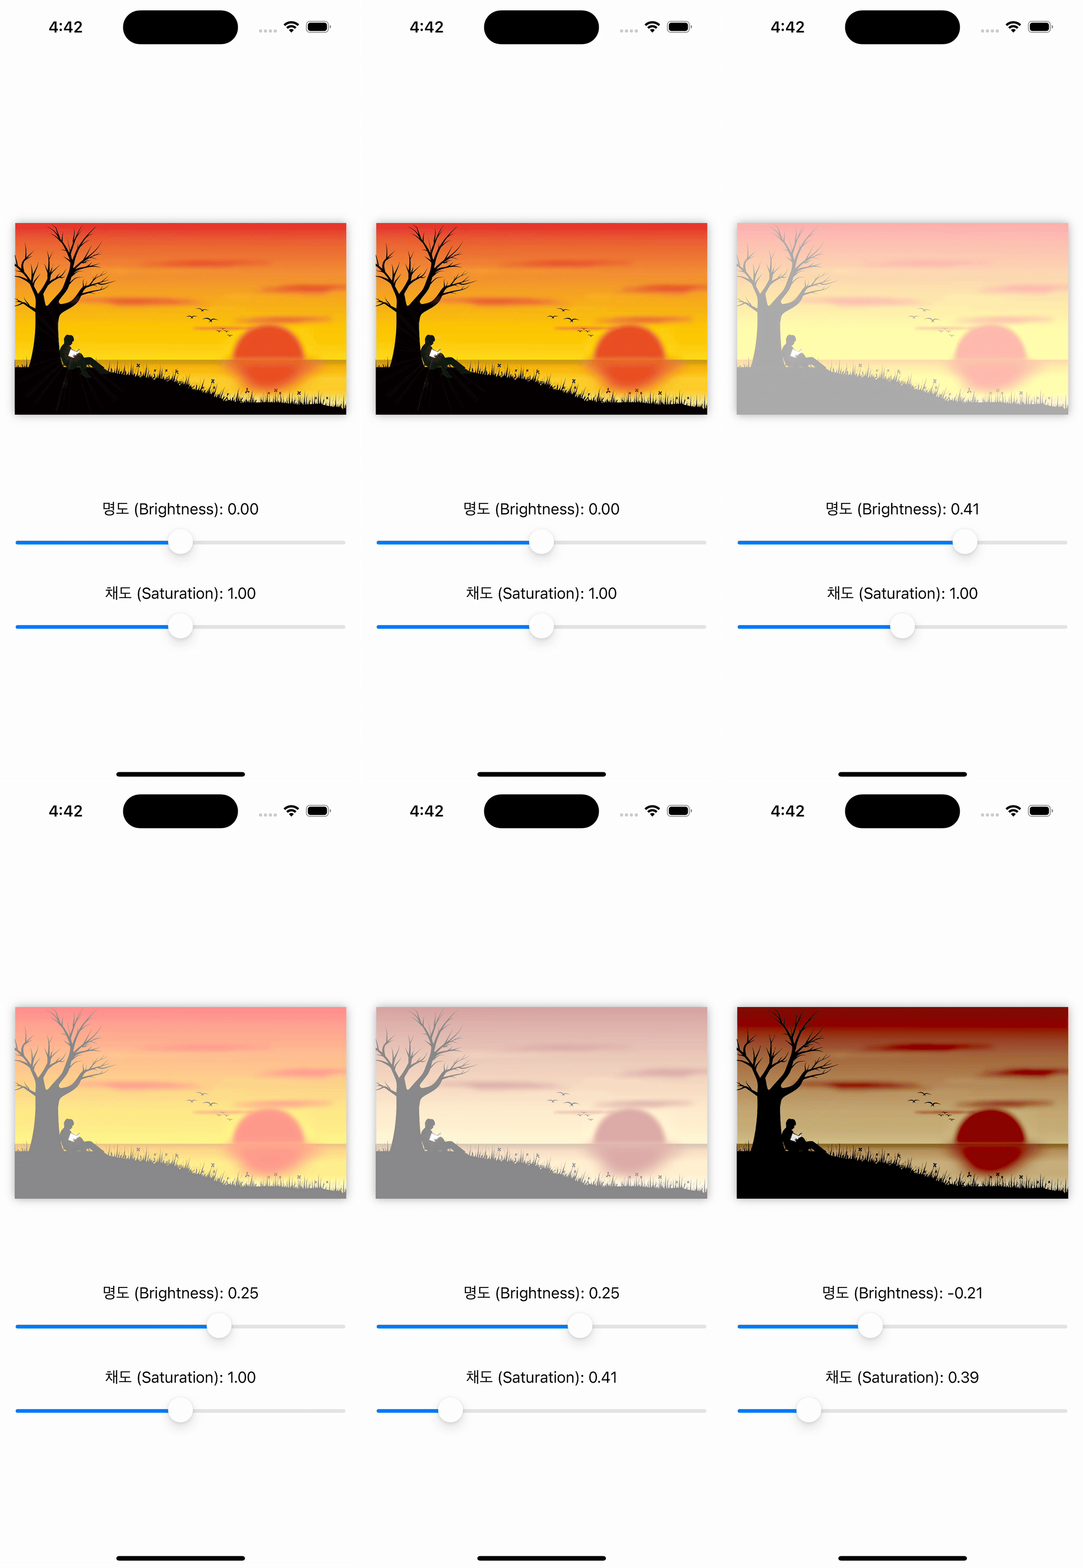
🔹메모리 관리 주의사항
큰 이미지를 처리할 때는 메모리 사용량을 주의해야 함
autoreleasepool을 사용해 메모리 해제를 도울 수 있음
autoreleasepool {
	// 이미지 처리 코드
}
'IOS > SwiftUI' 카테고리의 다른 글
| SwiftUI) DispatchGroup에 대해 알아보기 (3) | 2025.08.26 |
|---|---|
| SwiftUI) sound 기능 (0) | 2025.08.19 |
| Swift) Image Crop에 대해 알아보기 (0) | 2025.07.28 |
| SwiftUI) Path에 대해 알아보기 (0) | 2025.07.21 |
| SwiftUI) 이미지(사진) 권한 설정에 대해 알아보기 (0) | 2025.07.15 |
Comments

